The principle of bouncing flash


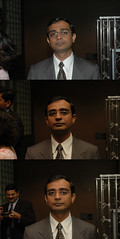
This is another example of the principle of a bounced flash. A bounced flash is when you use a flash and instead of directing it just at your subject, you reflect it or redirect it to diffuse the light. The reason for this is obvious in the example: it creates a more pleasing image especially in portraiture.

You can aim the bounce to the ceiling, especially with a relatively low, white painted roof. This will create extra light from above. Or you can aim it behind you to broadly diffuse the flash. You can use a large reflective surface or white board held up by an assistant to angle additional light at the subject. You can set up remote flashes if you're in a studio. You can buy a flash umbrella and use this to diffuse the light. Or, as I did, you can buy a 3x5" index card and rubber band it to your flash.

The example shows on top, a directly aimed flash. Note that the color temperature is very cold. There's quite a bit of glare. The background is very dark.

The middle image shows the flash aimed directly at the ceiling, which in this case was high and dark. As a result, the shadows are coming from the ceiling and the color temperature is much warmer, and the background is visible, but it there's quite a bit of shadow under the eyes and chin.

The bottom image is a flash aimed at the ceiling and an index card rubber banded to the back of the flash, reflecting some of the flash forward. Note that there is strong lighting from the front, and also the diffused flash from above. There is some glare, but not bad. The shadows are very diminished. It is a more pleasing image.

The technique itself for bouncing a flash isn't the same as a directly aimed flash. You need to meter to account for some light from the flash, but not all. In truth, you might meter very close to what you would shoot without any flash. For the most part, it will require wide aperture.

The disadvantages of bouncing flash are actually numerous. It kills depth. Often, because you lose a lot of shadows, you lose depth and perspective and images can seem very flat. You also lose depth of field. With the very wide apertures, you typically end up focusing to infinity. Also, you typically light up the background well enough that you can lose the depth that the shadows would add. It's also a bitch to meter, since you can't rely on the flash setting or the ambient light metering.

But it adds a lot of warm lighting for portraiture and for still lifes, and can replace complicated lighting when you're out and about. If you look at photojournalists, there are still a lot that use the index card bounce flash in their pro work. So it does have its place.

Zooming in


I bought a new zoom lens 70-300mm 'G' Nikkor lens for my D70. It was a prize at $140, but it's not the greatest lens. Still, when no one's paying for my glass, I got to take what I can.

I really like sports photography, so this is a lot of fun for me, but obviously, I need a lot of work.

Bouncing flash


I was at dinner with the other residents, and everyone was asking me why I was shooting with the flash aimed at the ceiling, and with an index card rubber banded to my flash. I took these shots to show why.

The top part is direct flash, with sharp, harsh shadows. The lower image is with the bounce, and it looks much better, I think.

I don't get a lot of chances to shoot people, so I revel in dinners like this where I can get all my gear together and no one really minds.

Technique - Composition

The most common piece of composition advice is the Rule of Thirds. This is the idea that if you split your picture into thirds vertically and horizontally, the ideal location for your subjects would be a third to the left or right, and the horizon should be lined up a third up or down.


This is universally accepted to be pedantic and trite. Oh, there's truth to it, yes, as you can see in the example. No doubt, using the rule of thirds will have you taking decent pictures, but as soon as you learn this rule, you will realize that it is overly simplistic, and that great photographs seldom adhere to such pithy guidelines.

What is useful about the rule of thirds is the idea that you should get your subject away from dead center. A camera's not a gun. You don't get better shots by lining up your target in the crosshairs. Keeping a subject away from center can convey things.

For example, the runner above is put off to the right, giving the feeling of movement, that she will be crossing from one side of the photo to the other. But from a rule of thirds perspective, this photo fails. The horizon's in the middle of the picture. But honestly, does that matter?

what you can also learn from the rule of thirds is to shoot pictures from unusual angles, and don't just line up the horizon. Get down, go up high, get creative with your angle and perspective.

The most basic piece of advice for decent pictures is to fill the frame, and don't leave a lot of dead space... unless that was your intent.

Camera basics - zoom

Zoom lenses are relatively new to the consumer market. Most all point-and-shoots offer some zoom ability, and most everyone with SLR's have at least one zoom lens. Here are a few things to remember about zooms.

The more zoomed in, the more the image will blur from hand movement. So when you're using a big zoom, you may have to stabilize the camera. If you watch sports photographers, they often have a stand to hold up their zoom lenses.

When zoomed in, there's less light entering the camera, and you'll need to expose more. This often translates to shooting with a slower shutter speed or a wider aperture.

It's worthwhile to mention that there is a huge difference between digital zoom and optical zoom. On some digital cameras, they offer you the option of a digital zoom and/or an optical zoom. The optical zoom is just like a film camera's zoom. The digital zoom is a software technique to enlarge the image. You should never use digital zoom, because it magnifies but does not resolve!

If you have no idea what I just said, think of it this way. Digital zoom is the same as taking a picture, loading it onto your computer, then enlarging the image. There's no added detail. It's the same picture, just blown up. The optical zoom will be a different picture with greater detail.

Camera basics - types of cameras

There are many different kinds of cameras. The most ubiquitous is the point-and-shoot [PaS] camera: you point it at something and shoot. While PaS is convenient, it has its limitations. Before digital, one of the big limitations was parallax.

Parallax is when what you see through the viewfinder is not what you actually catch on film. That's because they're lined up differently, and usually it's close enough, but sometimes close doesn't count.


The SLR (single lens reflex) camera eliminated parallax by using a system of mirrors to make the viewfinder view go through the lens. Thus, SLR's are WYSIWYG. When you take a picture with an SLR, the mirror flips up and exposes the film. So, you cannot see the image while you expose the film.

Most digital cameras have LCD displays which show you a WYSIWYG real-time display. So, parallax is more academic than anything else. But just like an SLR, when you take the picture, the display cuts away, and you can't see the image while you're exposing the CCD.

SLR's are favored by professionals because they have modular systems for lenses, they are more solid constructions, they all have hotshoes for external flashes, and SLR's give the photographer complete control.

While things like camera phones and pocket cameras (like my Elph) are enticing, they are often made with inferior optics ["glass"], have poor quality CCDs, and because they are so small, are very prone to blur from hand movement. They've found a place, but will never replace conventional cameras, and certainly not SLR's.

Camera basics - megapixels

You can think of megapixels in the same way as negative size. In film, you can shoot with 35mm film, or 2.5 inch negatives like portrait photographers, or in the old days, guys like Ansel Adams used 5"x7" glass plate negatives. Nowadays, it's hard to find any film other than 35mm or APS (which is even smaller) in the stores. So, more megapixels roughly translates to a larger image.

As you might imagine, more megapixels is nice, but more megapixels do not equal better pictures. A horrible lens or a low quality CCD can both make for a terrible picture despite megapixels.

This is why professionals use SLR's, where it may not have as many megapixels, but the CCD is higher quality and the lenses are better.

Camera basics - flash

The purpose of a flash is to add light to a subject when the situation is too dark. Also, flash can be used to add additional light to "fill" out the picture, softening shadows and bringing out a subject.

Flashes have an effective distance. Beyond that, the flash is useless. It's be like trying to light up the Golden Gate Bridge with a desk lamp. So please turn off your flash when you're shooting at a distance.

Most cameras these days have built-in flashes. For the most part, these flashes are underpowered, and will actually detract from the quality of your photos. Whenever possible, it's always better to use an external flash. External flashes have more control, and also can be aimed and diffused, or remotely activated! This versatility lends itself to flash bounce. I'll talk about that in photo techniques.


External flashes attach via a "hotshoe" which signals the shutter release to the external flash. Be careful about using external flashes with new cameras. Sometimes the voltages don't match, and you can damage your camera. Your best (but most expensive) bet is finding a flash that was designed to work with your camera.

Most flashes will require some cycle time to recharge, so pictures taken in rapid succession may not flash!

Camera basics - film

You might think that in this digital age, there's no need to talk about film, but the concept of film is valuable, and still applicable. Film varies by quality (duh) and by speed, called ISO (or ASA, the same thing). Film such as ISO 100 is very fine grain and very insensitive to light. Thus, it can be greatly enlarged without difficulty and can be used in very bright light.

"Faster" film such as ISO 800 has less fine grains, but it much more sensitive to light, so better in low light conditions. Typically, you have to get up to ISO's like 1600 before the graininess of fast film is really evident.

You can adjust ISO on most digital cameras, and the results are light sensitivity and graininess. I find that ISO 400 is a good balance between the extremes, but different speed films have their place.

The film quality itself is important too. Cheap film and cheap processing make for bad pictures. It's worthwhile to spend a little money for decent film and a photo processor that you trust (not the local supermarket...).

In digital cameras, this quality corresponds to the image sensor known as the CCD. A low quality CCD will give you low quality pictures. It's why, no matter what lens or how many megapixels, a cameraphone will never take as good pictures as my Nikon d70.

Camera basics - shutter speed

There isn't too much to understand about shutter speed. Speed is expressed as fractions of a second, so 60 = 1/60th of a second. Shutter speed moderates the amount of light allowed through the aperture. This can be used to limit light exposure, but can also be used to convey action.

If something is moving faster than the speed of the shutter, then it will be blurry because the film will remember all the time for which it's exposed. So, for example, if you were shooting a hummingbird at 1/20th of a second, the wings would be blurry, but if you shoot at 1/2500th of a second, the wings should be sharp.

Conversely, if you held the shutter open for hours pointed at the night sky, you could see the stars moving in the sky. That's the power of shutter speed control.

It's worth noting that anything slower than 1/60 will usually result in blurring from hand shake. To be safe, it's best to shoot all your shots slower than 1/60 with a tripod or with the camera stabilized against something.

Camera basics - aperture

Aperture is the physical opening that allows light onto the film. On a pinhole camera, this would be the actual pinhole. On a modern camera, there is a ring that can narrow or widen to change the aperture. The aperture controls two things: (1) the amount of light let into the camera at a given point in time, and (2) the depth of field [DoF].

The aperture is expressed as a fraction of the full focal length of the lens. It is written f/22 or f/16... There numbers are in strange intervals because each "full stop" is twice the area of the previous stop. This would be an increase or decrease in diameter by √2. These are the f-stops.

It's important to remember that the f-stop is a ratio, not actual sizes. So, for a 40mm lens, f/8 would be 40/8 = 5mm opening for light. However, an 80mm lens on f/8 would be 80/8 = 10mm.

Very simply, the bigger the number, the smaller the opening. f/22 is a very small opening letting in very little light. f/1.8 is a very large opening letting in a lot of light.

Why do we even care? Well, if it's bright out like in sunlight or snow, we have to limit the light, but if it's very dark out, we'll need to let in as much light as possible.

The other reason we care is depth of field. This is the area of a picture that's actually in focus. It can be a few millimeters wide or nearly infinite. In this way we can control what we want to accentuate. The most simple example would be a picture where the subject's in focus but the background's all blurry.

Preface

Understanding photography is not that difficult, and it's something that I enjoy greatly. It's an intensely powerful form of expression, and it's enjoyable on many diverse levels. Being good at photography takes an appreciation of the tools itself, and the ways it can be used. The modern camera can be intimidating, but every camera is essentially the same at heart. They all work by the simplest of concepts.

A camera at its most basic is simply a matter of light exposure. A piece of light-sensitive material is exposed to light through an opening. That's it. Everything else is flourish. By convention, we call the light-sensitive material film, the opening is called aperture, and the amount of time that the film is exposed to light is called shutter speed.

If one were to make a camera from these basics of photography, you'd have what's called a pinhole camera. It is a lightproof box with a piece of film inside and a pinhole through which light enters. It's not hard to make one yourself, but the developing and processing, that's tough. But it's a useful proof of the concept.

To understand your camera though, you'll need to understand aperture, shutter speed, and film. Understanding composition and technique doesn't require understanding your camera, but it sure helps.

I decided to start a blog for it, because the blog format is conducive to what I want to do, but the camera and composition sections of this site are structured like a tutorial rather than a blog.